
Unlocks via Quest: Not Easy Being Green (Mor Dhona)
Item level requirement: 90
Item level of dropped gear: 100
Also drops 3-star crafting materials (Saurian Skin, Cashmere Fleece etc tier)
Navigation:
General Info (Top) || Speedrun/Map || Boss Guides
WP Hard: General enemy tips
Ignore Banners/Flags/Standards: Drag enemies out instead
Wanderers Palace (WP) Hard Speedrun
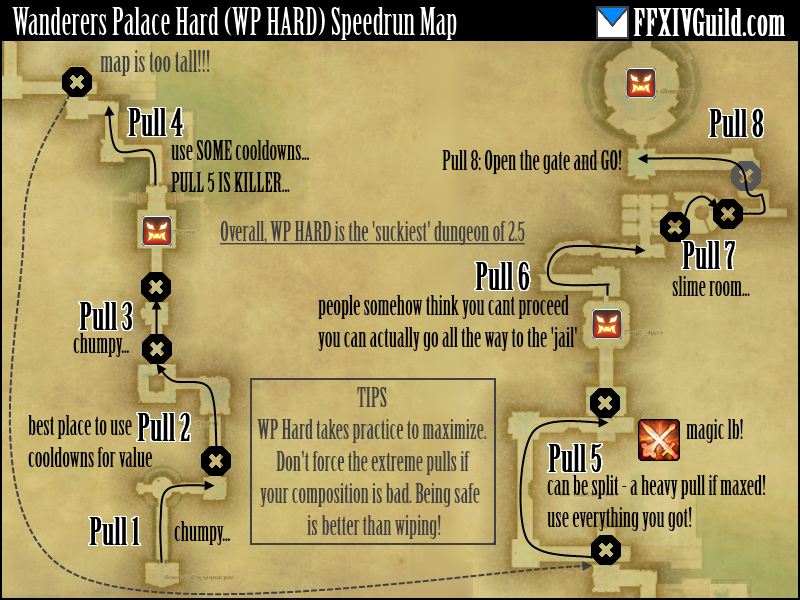
WP HARD is the longest dungeon in this bunch – it can be completed in a minimum of EIGHT PULLS. Although, for many groups, 9 or 10 seems to be the average! Special thanks to Claes Henrietta and Rylai Ariamis for the help with notes/map!
Pull 1: Small pull with 4 mobs, don’t waste anything here.
Pull 2: While not the beefiest of pulls, use your CD’s here since the next pull is chumpy, then boss follows
Pull 3: Small, time extending pull (boss 1 follows)
Pull 4: Can be a tricky pull due to camera angle, LOS the first pile behind the first corner, and get the rest of the chunk. Use SOME cooldowns here – it’s a bit heavy.
Pull 5: This pull is usually split, for good reason. It’s an insane pull that maxes out at 10 or 11 mobs. This, PLUS the fact the previous pull was heavy. Going all the way is NOT recommended for groups that AoE slowly. (boss 2 follows)
Pull 6: A lot of people think you have to stop at the 3 mobs.. you can actually pull allllll the way to the locked up tonberrys. It’s an easy pull of 5 mobs.
Pull 7: is a forced time waster. This is the “slime room”.
Pull 8: People usually split this but you can actually open the door and drag the pudding all the way to the end!!! This is value. (final boss follows)
Pull 5 is killer, you might need to chill out if you think your group isn’t up to snuff. We will be recording a vid of the “minimum possible pulls” for both warrior and paladin – stay tuned.
Boss 1: Frumious Koheel Ja
- Spawns these fireball adds that CANNOT be ignored.
Overall a nondescript boss which doesn’t do anything special. To be honest, I want to type more here – but I just cant.
Boss 2: Slithy Zolool Ja
- Randomly spawns a bunch of flags. You must get (walk into) them to survive. Each flag corresponds to an effect.
- 3 Negative totem types exist: Heavy, Frog, Fire RES down.
- One positive type exists: Damage dealt UP – DPS pick these up! BOSS MUST NOT ABSORB THIS.
- Other totems MAY BE ignored (Except, frog totem cancels out your frog status)
- Colors are random each time – just remember the DPS+, and healer get everything else!
Key reminders: DPS+ is massive value if picked up by DPS, and massive non-value if picked up by the boss. Frog totem cancelling DPS frog status will greatly reduce the encounter time.
Boss 3 (Final): Manxome Molaa Jaja
- Does a random slash which leaves a debuff: YOU CANNOT GET HIT BY HIS PBAOE if you have this debuff.
- Leaves flags (standard), just drag him away from the buffing AoE and continue killing.
- SACRED IDOL must be killed. Looks like the flags, so be aware.
- Healers: the Doom icon is similar to PS Sire: Healing to full cancels the doom.
TIPS: Don’t stay too far from the boss. he has a MASSIVE cone attack that you might not get out of. Don’t tunnel – kill Sacred Idol ASAP.
Other dungeons released in this tier (2.5):
Amdapor Keep (Hard) || Wanderers Palace (Hard) || Keeper of the Lake
Hopefully our Wanderers Palace Hard guide helped you out! Remember, careful speedrunning and accommodate first timers!
The Healer doesn’t have to pick up the rest of the totems on the second boss, esp not the Toad or the Fire Res down totems.
Also:
– The second boss casts toad at random. Players can use the toading totem to get rid of the debuff.
– You can always 100% guess the toad totem by looking at the colors that spawn in the first totem summon, because the first summon only has 3 colors, of which are the Damage Up, Heavy and Fire Res down totems.
Thanks for the heads up – I’m updating the dungeon guides today and these (as well as FCmate comments) will be added.
For boss 2, it seems the fields are random. When my team completed this, green was frog, red was fire resist down, cyan was heavy and purple was damage up.