Coils Turn 2 isn’t exactly just one Boss – it’s a series of mini-bosses leading up to the final boss. The stage itself has certain mechanics you should be aware of.
Coils Turn 2 Stage Mechanics
You have a time limit of 12 minutes to complete Turn 2. If the 12 minute mark is reached, and players still remain inside – a pulse doing heavy damage will continually affect players, inevitably causing a wipe.
There are 6 mini-bosses and 1 main boss. Killing a mini-boss does 2 things:
- REMOVES that mini-bosses unique ability from the main boss.
- GIVES that mini-bosses unique passive BUFF to the main boss.
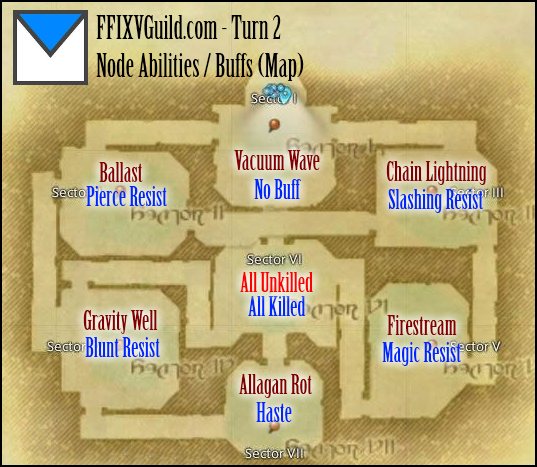
Here’s the Turn 2 Map showing the various nodes abilities and buffs:
It’s currently impossible to kill all mini-bosses within the time limit, so you must choose a certain course to follow. While there are many different ways to do Turn 2, these two routes are how we do it. We consider the alternative routes IMPOSSIBLE or HIGHLY IMPRACTICAL. First, we discuss the skills shared across all mini-bosses…
Shared Turn 2 Node skills
ALL NODES share certain abilities, up to the final boss.
Frontal Cleave – no surprise here… However, his basic cleave leaves a really bad…
Stacking debuff – Which increases damage taken. Stacks infinitely and refreshed upon every cleave. Drops after 30 seconds.
High Voltage – Remember from turn 1 ADS? It’s back. But this time a hundred times more fatal if it lands…
Repelling Cannons – Same ability from turn 1 ADS. But tanks with the debuff also take bonus damage!
So as usual, have your melee avoid cleave and cannons, and setup a silence rotation for High Voltage. As for the stacking debuff…
Dealing with the Turn 2 stacking debuff – Tank Swap
 Tank positioning is extremely sensitive for Turn 2. Here’s how we position our tanks (and melee dps). Your first goal in positioning should be to minimize or eliminate unnecessary cleaves – since the debuff wont fall off if your tanks get tagged!
Of course, with the shown, the melee dps have zero chance to get cleaved. The tanks also won’t get hit by each others cleave, when it’s not their turn to tank.
There’s many ways to swap… the method that worked for us is to have your current offtank do his enmity combo and WAIT on the last one (Rage of Halone or Butchers Block). Once the main-tank wants to switch (which we signal by jumping), simply Provoke and finish the combo!
Best Routes to take in Turn 2
As we mentioned above, the “South Eastern” Route is not really practical to do as of now… so here are the paths we use:
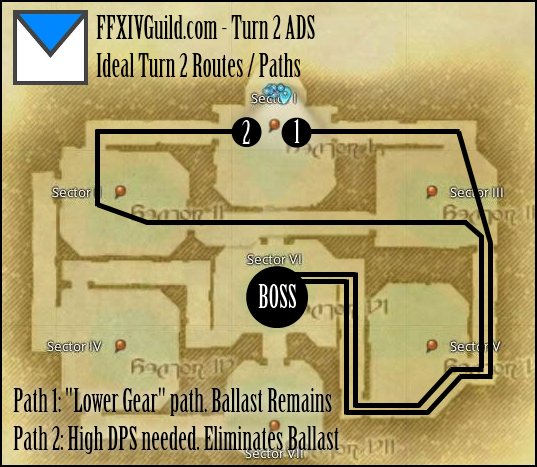
Route 1: Not Killing ‘Ballast’
Route one is the basic route.
Route 2: Killing ‘Ballast’.
As our gear progressed, we were able to kill an extra node on our way to the last boss. Eliminating ballast makes the final boss a little easier.
Using either of the two routes, you eliminate these abilities from the last boss:
Vacuum Wave – An AoE attack that pulls all players closer to ADS.
Chain Lightning – A generic arcing nuke that does medium damage.
Firestream – An omnidirectional AoE that does massive damage and leaves a huge burning DoT.
- (If route 2…) Ballast – A massive cone AoE with a small safe-spot behind ADS. Getting hit pushes you back a significant distance.
The abilities remaining on the last boss: Allagan Rot and Gravity Well will be discussed in the final boss section.
Turn 2 Final Boss – ADS
High Voltage -> Piercing Laser -> Repelling Cannons cycle makes a comeback with the turn 2 final boss. You may remember the similar mechanic from T1 ADS. This happens throughout the fight!
He’s just like all of the other nodes until he reaches certain life percents:
at 75% Allagan Rot – The defining mechanic of turn 2. Managing Allagan Rot will determine 90% of your chances at beating turn 2! This will be discussed in the next section.
at 50% Gravity Well – This is a randomly targetted AoE ground effect which applies a 15 second Heavy Debuff. The ground effect lasts for 15 seconds, and is recast 10 seconds after is expires.
at 25% Ballast – if you didn’t kill the node earlier on. Like explained earlier, A massive cone push back with a safe spot behind him.
Limit Break (Melee DPS) should be used anytime under 50% or 25% HP to reduce the time he has more skills active. Healer LB is also a viable choice if things go awry.
Dealing with Allagan Rot
Allagan Rot is a debuff that lasts 15 seconds. If 15 seconds pass and it is not passed to another player, the current victim will explode, and deal AoE damage (unlivable) to the entire raid – resulting in a wipe.
Passing Allagan Rot is as simple as walking to another player. After you’ve passed Allagan Rot, you have an Immunity that lasts 45 seconds. You cannot have Allagan Rot again until Immunity expires.
So what does all this mean!? You need to keep passing Allagan Rot amongst your party until ADS is dead. Failing to do so will result in Allagan Rot blowing up and you guys wiping, like mentioned earlier. This sounds confusing? It is at first, but when you get the hang of it – it’s quite simple. Look at the table below
Sample of Allagan Rot being passed at 5 seconds remaining
(Immunity is italicized, Rot is bold)
| Rot Passed at 5s | Player 1 | Player 2 | Player 3 | Player 4 | Player 5 |
|---|---|---|---|---|---|
| Pass 1 | 15 | 0 | 0 | 0 | |
| Pass 2 | 45 | 15 | 0 | 0 | 0 |
| Pass 3 | 35 | 45 | 15 | 0 | 0 |
| Pass 4 | 25 | 35 | 45 | 15 | 0 |
| Pass 5 | 15 | 25 | 35 | 45 | 15 |
As you can see, passing rot at 5 seconds remaining will result in pass 6 failing. Immunity on #1 has 15s remaining, and so does Rot on #5. So judging by this chart, the ideal time to pass between 5 people is with 4 or less seconds remaining on Allagan Rot.
We Highly Recommend numbering your party beforehand, and simply follow the numbers wherever rot initially lands, to eliminate all confusion! Here’s a sample…
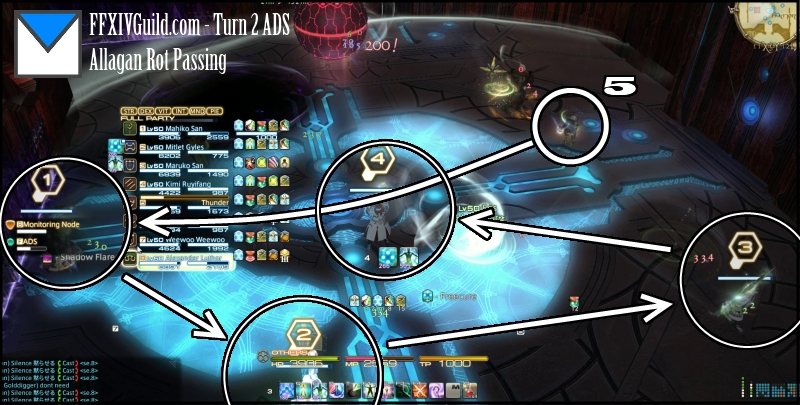
Passing of rot changes depending on the setup of your DPS:
Rot Passing (2 Melee 2 Ranged): [The DF setup]
Ranged (1) -> Healer (2) -> Ranged (3) -> Healer (4) -> Melee (5) -> Ranged (1) [Repeat]
Quite self-explanatory. If things go “wrong” simply have your extra melee (6) pass from (4) to (1). We always have 4 to 1 as a “Melee Assisted Pass”.
Rot Passing (1 Melee 3 Ranged): [Somewhat easier setup]
Ranged (1) -> Healer (2) -> Ranged (3) -> Healer (4) -> Ranged (5) -> Ranged (1) [Repeat]
Same as the setup above, but have your 3rd ranged “pretend” he’s melee by staying just outside Repelling Cannon Range. He can stay right above (1) in the picture above!
Rot Passing (4 Ranged) [“Stacking Method”]
Ranged (1) -> Healer (2) -> Ranged (3) -> Healer (4) -> Ranged (5) -> Ranged (1) [STACK UP]
While we never do this, If you have an all ranged party you can actually stack up after Ranged (5) gives it to Ranged (1). Rot will, amazingly, pass itself after that. If you do this method make sure you all DODGE IN THE SAME DIRECTION, when getting lasered or gravity welled.
Rot Passing (3 melee 1 Ranged): [“Not so bad!” setup]
Melee (1) -> Healer (2) -> Melee (3) -> Healer (4) -> Melee (5) -> Melee (1) [Repeat]
This one isn’t so bad as many people think. It’s actually pretty Easy. Once “Melee (5)” goes back to DPS the boss, he will automatically pass it to Melee (1) once (1)’s immunity expired!
Rot Passing (4 melee): [“Extreme” mode]
We won’t be discussing this method. It’s possible, but ultimately unlikely that it’s going to happen to many people. The hassle isn’t worth it. Although it could make a pretty interesting video… (idea…)
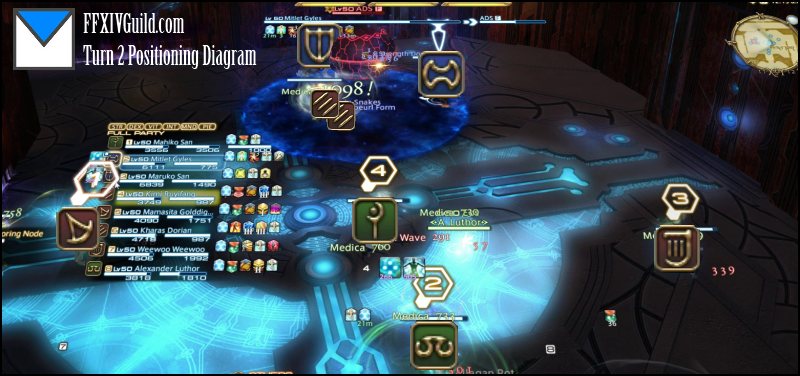
Turn 2 Positioning Guide
And finally, our suggested positioning during the final encounter:
ADS (Turn 2) Loot List
| Tank | Healer | Caster | MNK | DRG | BRD | |
|---|---|---|---|---|---|---|
| Weapon | - | - | - | - | - | - |
| Off-Hand | - | - | - | - | - | - |
| Head | - | Allagan Circlet of Healing | - | - | - | Allagan Visor of Aiming |
| Body | - | - | Allagan Tunic of Casting | - | - | - |
| Hands | - | - | Allagan Gloves of Casting | Allagan Gauntlets of Striking | Allagan Gloves of Maiming | - |
| Waist | Allagan Plate Belt | - | - | - | - | - |
| Legs | Heavy Allagan Cuisses | - | - | - | - | - |
| Boots | - | Allagan Boots of Healing | Allagan Boots of Casting | - | - | - |
| Neck | - | Allagan Choker of Healing | - | - | Allagan Choker of Maiming | |
| Earrings | Allagan Earrings of Fending | - | - | Allagan Earrings of Striking | - | Allagan Earrings of Aiming |
| Bracelets | - | - | Allagan Bracelets of Casting | - | - | - |
| Ring | Allagan Ring of Fending | - | - | - | - | - |
Well, I guess that’s it! If you think we missed any tips, or anything you’d like to chime in on – let us know in the comments!