
Unlocks via Quest: Not Easy Being Green (Mor Dhona)
Item level requirement: 90
Item level of dropped gear: 100
Also drops 3-star crafting materials (Saurian Skin, Cashmere Fleece etc tier)
Navigation:
General Info (Top) || Speedrun/Map || Boss Guides
AK Hard: General enemy tips
Tentacles: Give a VULNERABILITY UP debuff to YOU and YOUR ENEMIES – use them to your advantage!
Knotted Treant: They spawn weak adds, generally they can be ignored unless you pile them up with your SR pull.
Vulnerability Up on tank? No problem – esuna it!
Amdapor Keep (AK) Hard Speedrun
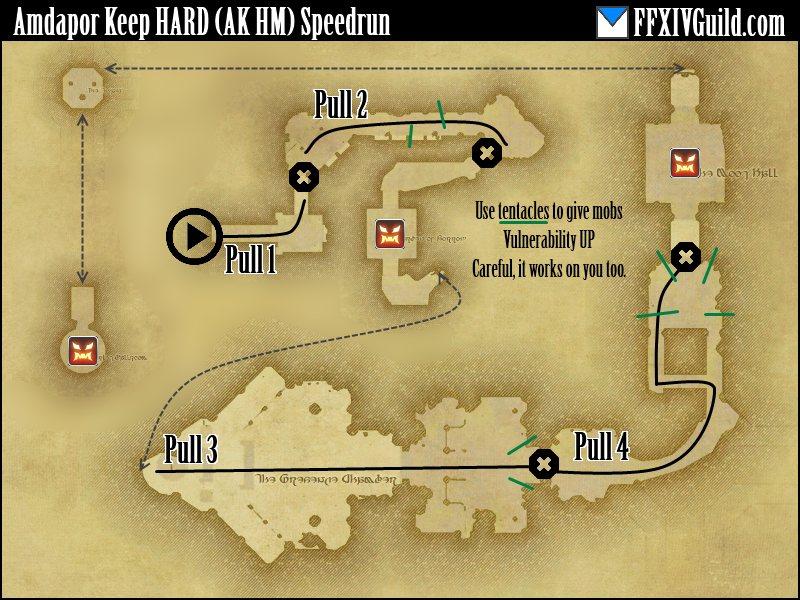
AK HM can be completed in a minimum of THREE BIG PULLS. Five or four if you’re being safe. And the forced “gauntlet” before the final boss. Special thanks to Claes Henrietta and Rylai Ariamis for the help with notes/map!! The above map says 4 pulls, but Pull 1 and 2 can be combined by killing the Ochu and proceeding (a bit on the risky side).
Pull 1: The first pack + the ochu, Don’t blow any CD’s here, It’s a small pull. Can be combined with pull 2.
Pull 2: This is the only “debatable” pull, and is stragely difficult. there are three ways to do this:
Pull 2 MAX: Drag EVERYTHING to the treant.
Pull 2 using tentacle: Drag all non treant mobs back to the tentacle. potentially dangerous.
Pull 2 split: Drag whatever you can to the pre-treant tentacle, then the remaining chumps+tree.
The general consensus is Pull 2 MAX is the “best”, but can be a backbreaker. Pull 2 tentacle depends too much on mob movement, and Pull 2 split is best for iffy groups. You want to use all your cooldowns for this.
(boss 1)->Pull 3: A short pull, gather them up and use the tentacle to give the mobs vuln up. Kill tree after.
Pull 3 VALUE: Tag the mobs with tentacle vul up, then move to the tree.
Pull 4: This is a LONG WALK. Sprinting could be an option. As always sprint pulls are gonna be a little easier for paladins. Use the tentacle of heavenly value. ALWAYS
Pull 4 VALUE: Tag them with vuln up, then move to the tree. This can be very risky.
(boss 2), Gauntlet, then (boss3): And you’re done! Potentially the fastest SR in this tier of dungeons.
We will be recording a vid of the “minimum possible (3) pulls” for both warrior and paladin – stay tuned.
Boss 1: Anchag (“Odin”)
- Charge is unavoidable. Walking nearer to him does significantly reduced damage. Instakills statues – careful.
- Lasers: Targetted ally must move behind statues. Extremely strong damage otherwise.
- Hiding behind higher health statues is preferred. (Statues may die WHILE lasering)
- All his attacks, even his basic DAMAGES statues: Tanking in middle is safest.
- Laser affects tank (rare, but it killed me once lol)
Not many special mechanics behind this guy. Just burn him as fast as possible. TIP: Tank reposition to new statue after each laser. No joke, lasers are fatal and you should avoid them.
Boss 2: Boogeyman
- Boogeyman periodically goes Invisible. He cannot be damaged/targetted during this time – but you can still “see” him.
- When you kill Luminescence(add) stand in the AoE it leaves upon death. It gives you a buff.
- Going near the boss while buffed reveals him. (Buff signified by pulsing light)
- “DODGE” the massive cone by facing AWAY from him ala Melusine.
- Kill the big fat add with a long channeled skill: causes a raidwide bleed.
TIP: The dead bodies on the ground signify the adds spawnpoints. The first set is the two chumps, second set is two chumps + fat.
Boss 3 (Final): Ferdiad
- Kill adds tethered to boss. (Stops “wild card” from expanding)
- Slime adds bind the target. Slimed people can free themselves by helping DPS.
- In the 2 slime 1 fat tether setup: just dps the fat tether guy.
The final boss isn’t very notable, pretty much common sense mechanics. TIP: Don’t clump up, the blades left by Black Wind can be annoying if you’re clumped up with friends.
Other dungeons released in this tier (2.5):
Amdapor Keep (Hard) || Wanderers Palace (Hard) || Keeper of the Lake
I hope our Ampdapor Keep Hard guide was useful to you! As always, careful speedrunning and be good to first timers!
YOU NEED TO DO THE QUEST FOR KEEPS SAKE TO UNLOCK THIS NOT (NOT EASY BEING GREEN)
You can find the quest Keeps Sake in Mor Dhona outside of Rising Stone 22X Y8 by talking to Lauriane.
Charge attack is nullified if you make it behind boss.
On third boss, trapped players can kill the slimes themselves by targeting it. Others will be busy with adds anyway, since adds are priority cause of the range of bosses attack.
Thanks for the comment! FCMates have added their thoughts to the mix and this was one of them – will be in my next update (in a few minutes lol)
Boss 2, turn away from the giant cone attack to avoid confusion. Most gaze attacks work this way
Aye – I have that lined up in my update to this guide
Boss 1: Charge is unavoidable, yes… but does much less damage if you run to his feet (low hundreds compared to 2k+ at max distance).
Also, for boss 3, for the single tethered add (2nd set of tethers), if you’re bound by the slime and you are ranged, kill the tethered mob first before freeing yourself or others. You have plenty of time to kill the slime, but not as much time to kill the tethered mob to stop Wild Card.